

How to Transfer Phone Files to Comp
Phone Transfer
- Get Data from Android
- Transfer from Android to Android
- Transfer from Android to BlackBerry
- Import/Export Contacts to and from Android Phones
- Transfer Apps from Android
- Transfer from Andriod to Nokia
- Android to iOS Transfer
- Transfer from Samsung to iPhone
- Samsung to iPhone Transfer Tool
- Transfer from Sony to iPhone
- Transfer from Motorola to iPhone
- Transfer from Huawei to iPhone
- Transfer from Android to iPod
- Transfer Photos from Android to iPhone
- Transfer from Android to iPad
- Transfer videos from Android to iPad
- Get Data from Samsung
- Transfer Data to Samsung
- Transfer from Sony to Samsung
- Transfer from Motorola to Samsung
- Samsung Switch Alternative
- Samsung File Transfer Software
- LG Transfer
- Transfer from Samsung to LG
- Transfer from LG to Android
- Transfer from LG to iPhone
- Transfer Pictures From LG Phone to Computer
- Mac to Android Transfer

Mar 26, 2022 • Filed to: Data Transfer Solutions • Proven solutions
It is not uncommon to want to move files from your phone memory to your computer. There are several reasons why you may need to do this. The most common reasons are a need for storage space and performing operations on the files.
Whatever your reason is, it is important to know how to transfer files from phone to PC. There are several methods of moving files to computers from phones. We will discuss a few in this post.
Part One: Transfer files from phone to computer in one click
You must have heard of third-party software that helps in managing phones. Dr.Fone is one such third-party software. This app was designed to facilitate the transfer of files between phones and computers.
There are several modules such as the Dr.Fone Phone Manager for Android. This is the one we will focus on in this post. It enables the user to move files and manage them across several devices.
Many users see Dr.Fone as superior software to many others on the market. This is because it is compatible with several kinds of files such as SMS, documents, videos, photos, music, and apps. Beyond this, it bridges the gap between phones and computers where both devices are originally incompatible.
Above all, Dr.Fone is the people’s favourite because of its one-click advantage. Below is a summary of the capabilities of Dr.Fone Phone Manager.
Dr.Fone - Phone Manager
Transfer Data Between Phone and PC Seamlessly.
- Manage, transfer, and import/export music, videos, photos, SMS, contacts, and apps.
- Backup for your files on the computer and ensures easy restore on the occasion of data loss.
- Transfer between iTunes and Android.
- Compatible with Android and iOS.
- Compatible with Mac 10.13 and Windows 10.
With all of these in mind, let’s look at how to move files from phone to PC using Dr.Fone. For easier understanding, we have broken the process into steps.
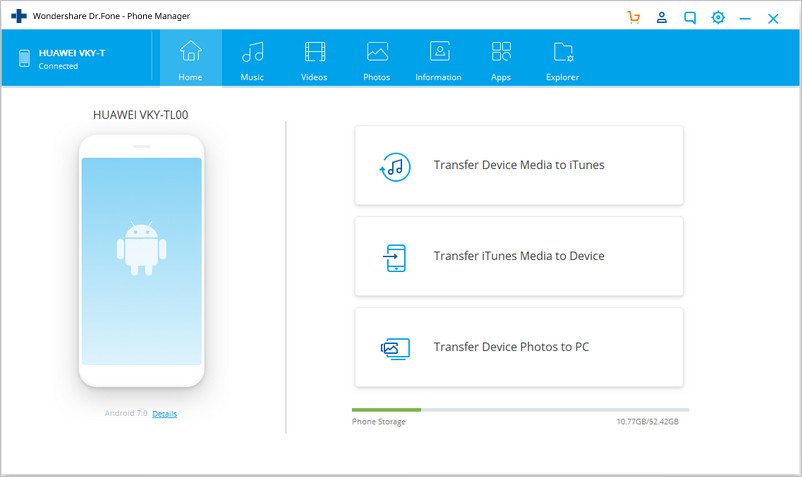
Step 1 – Launch Dr.Fone on your computer. After it opens, select the “Transfer” component. Now, you can plug your device using a USB data cable.

Step 2 – Immediately you establish a connection, the software presents you a couple of options on the home page. Choose the section from which you want to move the files. The likely sections include photos, music, videos, etc. For this post, we will be using photos.
Step 3 – If you want to transfer photos, click the “Photos” tab. It shows you all the images present on your device.
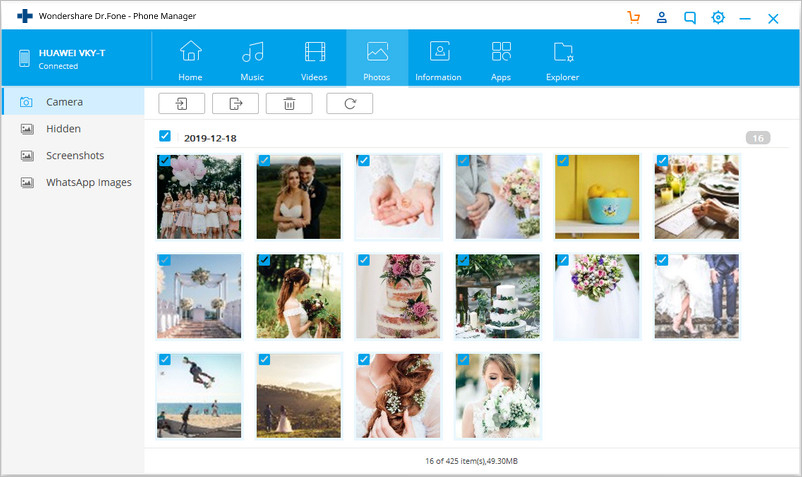
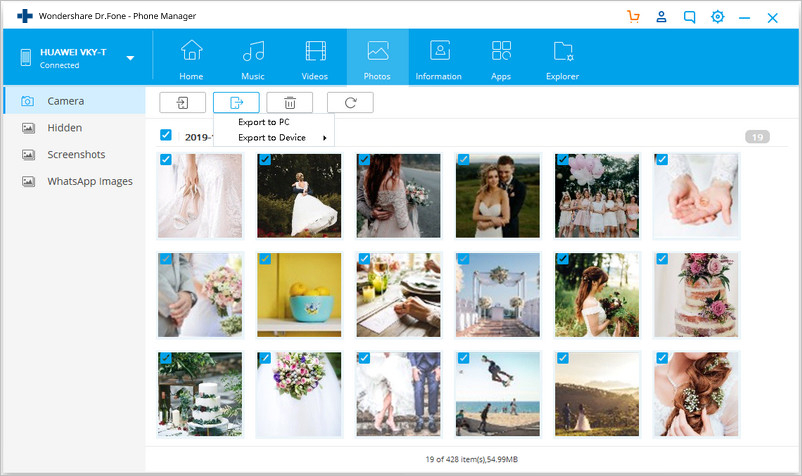
Step 4 – Choose the photos that you need to move to your computer. After selecting the photos, click on “Export to PC” to initiate your transfer.
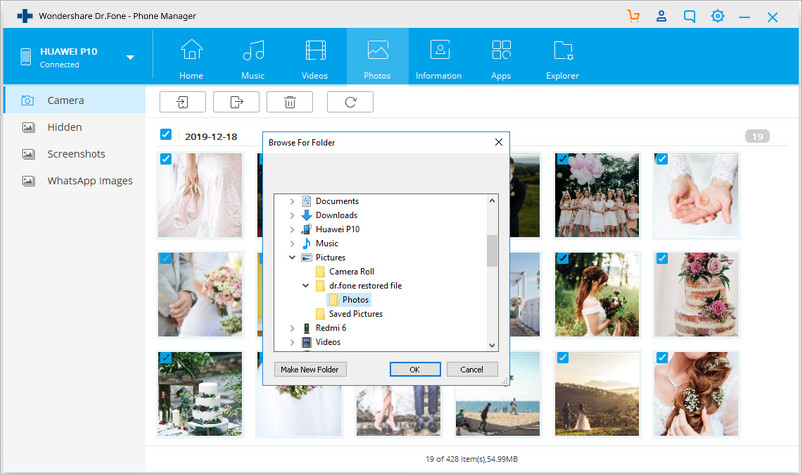
Step 5 – Select the location you desire to store the files on your computer. Once you do, click ok and the transfer begins immediately.
Can you see that using Dr.Fone to for file transfer from mobile to PC is very simple? Let’s take a look at other methods of transferring files to your computer from a phone.
Part Two: Transfer files from phone to computer using file explorer
Moving files to your computer from a phone using file explorer even though most people think it contrary. There are two methods of doing this, each one involves a plug and play. The two methods are:
- Transfer using a USB cable
- Transfer using SD card
We will discuss each of these in the steps below.
Transfer using a USB cable
You can make use of this method if you do not have a phone manager app on your computer. All you need is a USB data cable. For the process to be seamless, make sure you use an original.
When it comes to transferring files to and from your computer, this is the most basic method. So how do you do this? Check out the steps below:
Step 1 – Connect your smartphone to the computer using a USB data cable.
Step 2 – Choose your connection type and set it to file transfer. If you don’t do this, your computer will end up charging your device instead of accessing files.
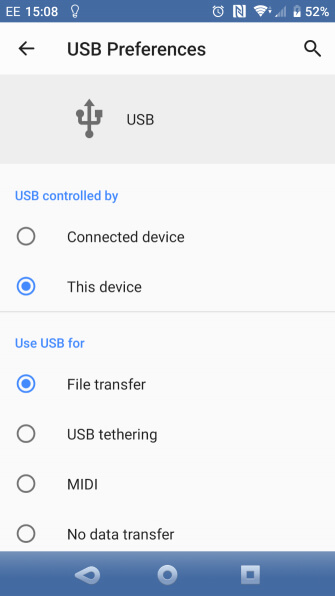
Step 3 – If this is the first time you are connecting the device to the computer, a prompt pops up. It asks you to “Allow Access” to your phone. Click on “Allow.” Most likely you’ll get this prompt on your mobile phone as well.
Step 4 – Open the File Explorer on your computer. You can do this by clicking on the shortcut on the taskbar. An alternative method is to go to the “Start Menu” and click on “File Explorer” from here.
Step 5 – Under “This PC” you should see your mobile phone. It is easy to identify once you know the name of your device.
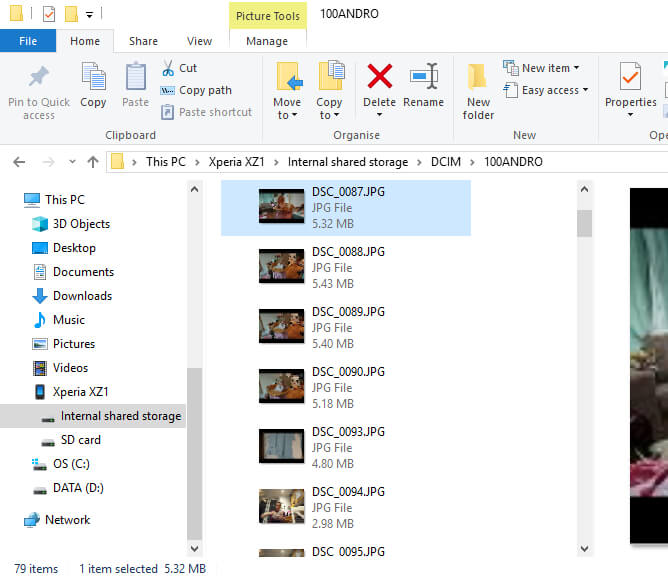
Step 6 – Double-click on your device to reveal the different folders on your device. Browse through the folders to find the content you want to copy.
Step 7 – Select the content you want and right-click on it. This reveals a menu list and you can choose “Copy.” An easier way to do this is to select the content you want to move and press “CTRL + C” to copy.
Step 8 – Open the folder you want to store the files on your computer. Right-click inside the folder and select “Paste.” Another way to do this is to open the folder and press “CTRL + V.”
Note that Windows will install the drivers of your phone if this is the first connection.
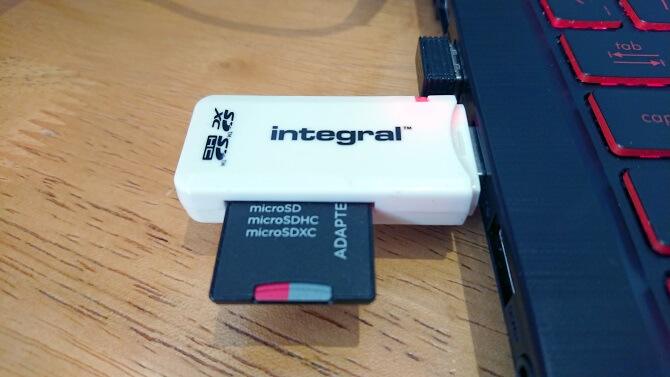
Transfer using SD Card
This is the second way to transfer files from phone to PC using file explorer. It doesn’t need a USB connection but a card reader. Most computers come with an SD card slot. If yours doesn’t have one, then you can buy an external SD card reader.
The process is quite simple. Check out the steps below:
Step 1 – Copy your files from your phone memory to the SD card.
Step 2 – Eject the SD card from your phone and put it in the SD card adapter.
ნაბიჯი 3 – ჩადეთ SD ბარათის ადაპტერი თქვენს კომპიუტერში ბარათის სლოტში. თუ თქვენს კომპიუტერს არ აქვს, ჩადეთ ბარათის ადაპტერი გარე ბარათის წამკითხველში და შეაერთეთ იგი.
ნაბიჯი 4 - გახსენით "File Explorer" თქვენს კომპიუტერში. ამის გაკეთება შეგიძლიათ ამოცანების პანელზე არსებული მალსახმობის საშუალებით ან "დაწყების" მენიუს მეშვეობით.
ნაბიჯი 5 - იპოვეთ თქვენი SD ბარათი "ამ კომპიუტერის" ქვეშ. ორჯერ დააწკაპუნეთ მასზე SD ბარათის გასახსნელად.
ნაბიჯი 6 – იპოვნეთ საქაღალდე, რომელიც შეიცავს ფაილებს, რომელთა კოპირებაც გსურთ.
ნაბიჯი 7 – აირჩიეთ ყველა ფაილი, რომლის კოპირებაც გსურთ და დააწკაპუნეთ მარჯვენა ღილაკით. ეს გაძლევთ პარამეტრების ჩამონათვალს, აირჩიეთ "ასლი". თქვენ ასევე შეგიძლიათ დააჭიროთ "CTRL + C" ყველა ფაილის არჩევის შემდეგ, რომ დააკოპიროთ ისინი.
ნაბიჯი 8 – გახსენით დანიშნულების საქაღალდე და დააწკაპუნეთ აქ მარჯვენა ღილაკით. აირჩიეთ "ჩასმა" ფაილების გადასატანად. თქვენ ასევე შეგიძლიათ გახსნათ საქაღალდე და დააჭიროთ კლავიატურაზე „CTRL + V“ ფაილების გადასატანად.
გილოცავთ, თქვენი ტრანსფერი დასრულებულია. ახლა მოდით შევამოწმოთ ფაილის გადაცემის საბოლოო მეთოდი მობილურიდან კომპიუტერზე.
ნაწილი მესამე: გადაიტანეთ ფაილები ტელეფონიდან კომპიუტერში ღრუბლოვანი სერვისით
ღრუბლოვანი საცავის გამოყენება ძალიან გონივრული ვარიანტია, როდესაც გსურთ ფაილების გადატანა კაბელების გარეშე. Wi-Fi ასევე არ არის აუცილებლობა, სანამ თქვენ გაქვთ ინტერნეტი. არსებობს რამდენიმე ღრუბლოვანი სერვისი, მაგრამ ჩვენ განვიხილავთ ორს. Ისინი არიან
- Dropbox
- OneDrive
მოდით განვიხილოთ ეს უკეთესად ქვემოთ.
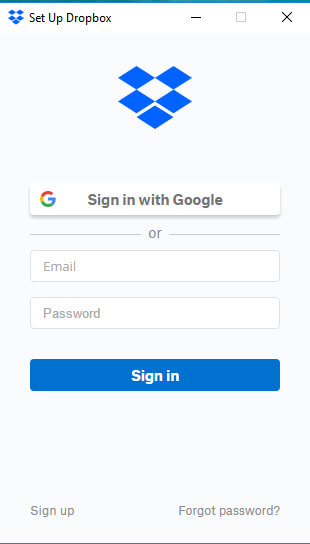
Dropbox-ის გამოყენებით
Dropbox არის ღრუბლოვანი შენახვის აპლიკაცია. თქვენ ასევე შეგიძლიათ გამოიყენოთ ვებგვერდი. იდეა არის თქვენი სხვადასხვა მოწყობილობების სინქრონიზაცია ამ აპლიკაციაში. როგორ აკეთებ ამას?
ნაბიჯი 1 - დააინსტალირეთ Dropbox თქვენს კომპიუტერზე და ტელეფონებზე. თქვენ ასევე შეგიძლიათ იგივე გააკეთოთ, თუ თქვენ გაქვთ ტაბლეტი.
ნაბიჯი 2 – შედით აპში თქვენს ტელეფონზე და კომპიუტერზე.
ნაბიჯი 3 – დაამატეთ ყველა ფაილი, რომლის გადატანა გსურთ თქვენს ტელეფონზე Dropbox-ში. როგორც კი ამას გააკეთებთ, ის ავტომატურად გამოჩნდება თქვენს კომპიუტერზე და სხვა დაკავშირებულ მოწყობილობებზე.
ნაბიჯი 4 – უბრალოდ ჩამოტვირთეთ ფაილები თქვენს კომპიუტერში, როცა დაგჭირდებათ.
OneDrive-ის გამოყენება
OneDrive არის ღრუბლოვანი შენახვის კიდევ ერთი შესანიშნავი აპლიკაცია, რომელიც შეგიძლიათ გამოიყენოთ ფაილების ტელეფონიდან კომპიუტერზე გადასატანად. თუ ახალი ხართ ღრუბლოვანი მეხსიერების გამოყენებაში, შეგიძლიათ უპირატესობა მიანიჭოთ ამ აპლიკაციას. მისი გამოყენება უფრო ადვილია და არის წინასწარ დაინსტალირებული Windows 10-ზე.
აი, როგორ გადაიტანოთ თქვენი ფაილები OneDrive-ის გამოყენებით:
ნაბიჯი 1 – აირჩიეთ ფაილები ან საქაღალდეები, რომელთა გაზიარებაც გჭირდებათ და შეეხეთ „გაზიარებას“ თქვენს ტელეფონში. ეს გაძლევთ ბმულის გაზიარების შესაძლებლობას.
ნაბიჯი 2 – აირჩიეთ, შეუძლია თუ არა მიმღებს მისი რედაქტირება ან უბრალოდ ნახვა. მას შემდეგ, რაც მას აზიარებთ თქვენს კომპიუტერთან, უნდა აირჩიოთ „ნახვა და რედაქტირება“.
ნაბიჯი 3 – დააწკაპუნეთ „გაზიარებაზე“ აპის გადასატანად.
ნაბიჯი 4 – გახსენით OneDrive თქვენს კომპიუტერში და აირჩიეთ ფაილები, რომელთა ჩამოტვირთვაც გსურთ. დააწკაპუნეთ "ჩამოტვირთვაზე", რათა გადაიტანოთ ისინი თქვენს კომპიუტერში.
ჩვეულებრივ, იღებთ ელფოსტას, რომელშიც გეუბნებით, რომ OneDrive საქაღალდე ან ფაილი გაგიზიარეს. ასეთი ფაილების მოსაძებნად აირჩიეთ მენიუ და დააწკაპუნეთ „გაზიარებულ“ აპლიკაციაში.
დასკვნა
ახლა თქვენ იცით, როგორ გადაიტანოთ ფაილები ტელეფონიდან კომპიუტერში. ეს არ არის ისეთი რთული, როგორც თქვენ გეგონა, რომ იქნება, right? თუ რაიმე ნაწილი არ გესმით, გვკითხეთ კომენტარების განყოფილებაში და ჩვენ განვმარტავთ.


Alice MJ
პერსონალის რედაქტორი