How to Transfer Photo from Phone to Laptop?
Apr 27, 2022 • Filed to: Backup Data between Phone & PC • Proven solutions
When was the last time you carried a full-fledged camera system with you? Today, most of us take photos on the go with our mobile phones, and for good reason. The camera systems in mobile phones today rival the top camera manufacturers in the world, and the performance is mostly adequate for most purposes. Needless to say, that today, most people have a camera phone and one of the top reasons people consider upgrading their phones each year is the camera improvements. Today, some of the top camera phones in the world can record 8K videos and 48 MP camera systems seem to be a new normal. All this technology is great, but it comes at a cost that is not money. The cost is data storage, and manufacturers do not provide adequate storage today that you might feel comfortable with, considering the large file sizes of these ultra-high-resolution recordings and multi-megapixel photos and that people need storage for other items such as games, music and videos not recorded on the phone but stored on the phone temporarily for viewing. Sooner or later, people face the question - how to transfer photos from phone to laptop?
The Good Old USB Method With Dr.Fone Phone Manager
The simplest and the fastest way to get photos from your phone to laptop remains connecting your phone to your laptop with a USB cable and using the excellent and powerful suite of tools called Dr.Fone to manage media on your phone on a laptop. In a few simple steps, you will be transferring photos from phone to laptop.
Setting Up Your Phone
Nothing needs to be done on an iPhone. For Android phones, the steps are provided.
Step 1: Connect your phone to the laptop using a USB cable
Step 2: On the phone, swipe down from the top and in the notifications, select USB. Within these settings, select File Transfer.
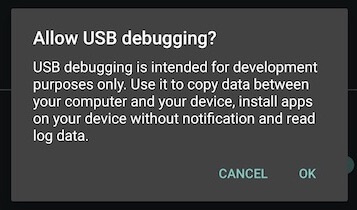
Step 3: If you have Developer Mode activated on the phone, you most likely have USB debugging enabled as well. If not, go to developer options in Settings and enable USB debugging. If you do not have Developer Options enabled or do not know how to enable them, move to step 4.
Step 4: Go into Settings and tap About Phone.
Step 5: Scroll down to the build number and keep tapping it till Developer Options are enabled.
Step 6: Go back into Settings and scroll down to System
Step 7: If Developer Options are not listed inside System, tap Advanced and then tap Developer Options
Step 8: Scroll down to find the USB debugging option and enable it.

Downloading And Setting Up Dr.Fone Phone Manager
Step 1: Download and install Dr.Fone Phone Manager on your laptop
Step 2: Launch Dr.Fone on your laptop
Step 3: Choose Phone Manager
Transferring Photos From Phone To Laptop Using Dr.Fone USB
When you launch Dr.Fone Phone Manager, you will see a clean window with large tabs at the top and some common, one-click actions listed beside an image of your phone in a big, clear font.
One-Click Step: All you need to do is select the first option that says Transfer Device Photos. In the next popup, select the location where you want to export your phone’s photos and all your photos will be exported from your phone to the computer.

Dr.Fone - Phone Manager (Android)
Transfer Data Between Android and Mac Seamlessly.
- Transfer files between Android and computer, including contacts, photos, music, SMS, and more.
- Manage, export/import your music, photos, videos, contacts, SMS, Apps etc.
- Transfer iTunes to Android (vice versa).
- Manage your Android device on computer.
- Fully compatible with Android 8.0.
Transfer Photos From Phone To Laptop Wirelessly Without USB
The world is going wireless today. We have hated cables for long, and today phones come equipped with wireless charging capabilities to make your life truly wireless, should you want it to be. Transferring photos from phone to laptop wirelessly can be done as sync over the cloud as well, and photos will be right where you want them to be, like magic. Sure, that consumes data but might be more convenient depending on the way you look at it.
Dropbox
Dropbox is a common, cloud-based file-sharing solution wherein you get a starter 2 GB ‘box’ for you to store your files in and that you can sync over the cloud and make available to all your devices using the Dropbox apps on devices. Considering that this solution consumes data and the starting storage is a meagre 2 GB, Dropbox is not recommended for use as a standard way to transfer photos from phone to laptop or store your photos in the cloud or keep your photo collection synced. Now, if you pay for Dropbox’s higher storage tiers, or are not a very heavy user and can make do with the meagre 2 GB storage you get for free, Dropbox can be a quick and easy way to transfer your photos from phone to laptop, if you do not mind the data consumption and the time it takes to upload photos from phone to Dropbox’s servers.
Uploading Files From Phone
Step 1: Install the Dropbox app on your phone
Step 2: Launch the app
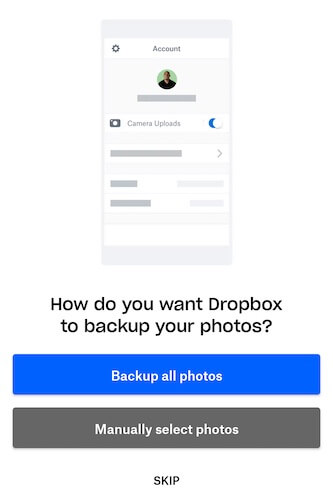
Step 3: Dropbox asks you at launch if you want to use Dropbox to backup your photos to the Dropbox servers or if you want to manually select photos to backup, or if you want to skip the step altogether.

Step 4: Now, if you are on the free tier with 2 GB storage, and you are just starting, or if you are on one of the fancy high storage tiers that Dropbox offers, you can start by allowing Dropbox to backup all photos on your device. Dropbox will create a folder and upload all your photos from the device to that folder in your Dropbox. If you are using Dropbox to transfer a few photos randomly, then choose to skip the automatic backup.

Step 5: Once you are signed in to your Dropbox, go back to your app drawer and launch Google Photos
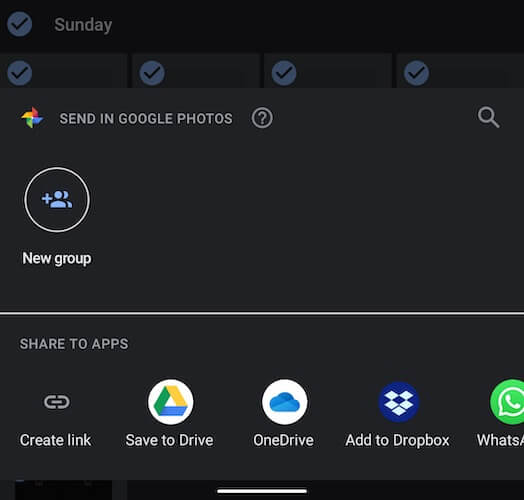
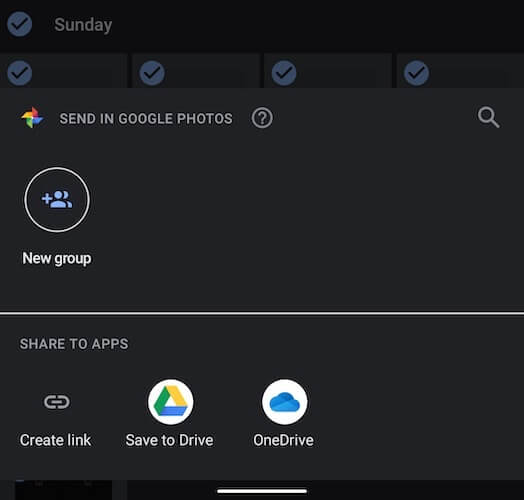
Step 6: Choose the photos you want to transfer from phone to laptop using Dropbox, and then tap the Share icon at the top, and select Add To Dropbox option.
Step 7: Dropbox will upload files from your phone to the cloud.
Downloading Files On Laptop
Step 1: Visit https://www.dropbox.com or if you have the Dropbox app on your computer, launch it.
Step 2: If you had not selected a different location to save while sending files to Dropbox on your phone, you will find your photos in the Sent Files folder. If you had chosen to backup automatically, the photos will be in the Camera Uploads folder.
Step 3: Select the files by clicking on the empty square that pops up on each file to the left of the file name when you hover over the files and then select the download option on the right.
WeTransfer
WeTransfer is a relatively easy and a quick and easy way to send files to people, and you might think that this could work for transferring photos from phone to laptop as well. To save you some trouble, in short, let’s say some options are more suited to sending photos from Android to laptop, such as Dr.Fone - Phone Manager for Android if you want to use a USB cable, or could-based solutions already integrated into Android such as Google Photos and Google Drive, or third-party solutions such Microsoft OneDrive. Still, if you want to use WeTransfer to send photos from phone to laptop, here are the steps.
Step 1: Launch the app store on your phone and download the Collect app by WeTransfer
Step 2: Launch the app
Step 3: Select All Items tab at the bottom, then tap Share Files at the top-right
Step 4: Select Photos from the options
Step 5: Select the photos you want to transfer.
Step 6: You can finish the transfer using Collect, or copy the link to share it in an email.
If you choose to email, you will receive an email with the link to download the files you just transferred.
Microsoft OneDrive
Microsoft offers its cloud storage solution under the OneDrive banner and gives every user a generous 5 GB for free, compared to Dropbox’s 2 GB. This is comparable to what Apple provides as Apple also provides 5 GB free iCloud storage to users. OneDrive is easily integrated into both macOS and is tightly integrated with Windows File Explorer making it a good choice to transfer photos from phone to laptop.
Send Photos From Phone To OneDrive
Step 1: Install and launch the OneDrive app on your phone
Step 2: Create a new account if you are a new user, else sign in to your existing Microsoft Account
Step 3: Go to the photos app on your phone and select the photos you want to transfer from phone to laptop using OneDrive
ნაბიჯი 4: აირჩიეთ ფაილების ატვირთვის მდებარეობა OneDrive-ზე. ფოტოები ახლა აიტვირთება OneDrive-ში.

ჩამოტვირთეთ ფოტოები OneDrive-დან ლეპტოპზე
ნაბიჯი 1: გახსენით Windows File Explorer, თუ იყენებთ Windows და აირჩიეთ OneDrive მარცხენა გვერდითი ზოლიდან. გარდა ამისა, გამოიყენეთ Windows Start მენიუ OneDrive-ის მოსაძებნად. ორივე მიდის ერთსა და იმავე ადგილას File Explorer-ში. თუ macOS-ზე ხართ, ჩამოტვირთეთ OneDrive, დააინსტალირეთ და ის ხელმისაწვდომი იქნება Finder-ის გვერდითა ზოლში.
ნაბიჯი 2: შედით თქვენს OneDrive-ში თქვენი Microsoft-ის ანგარიშის გამოყენებით, თუ უკვე არ ხართ შესული. გამოტოვეთ ეს ნაბიჯი, თუ თქვენ ხართ macOS-ზე, თქვენ უკვე შეხვედით, როგორც OneDrive-ის დაყენების პროცესის ნაწილი macOS-ზე.
ნაბიჯი 3: აირჩიეთ და ჩამოტვირთეთ ფოტოები, როგორც სხვა ფაილებსა და საქაღალდეებს File Explorer-ში ან Finder-ზე macOS-ში.
დასკვნა
ფოტოების ტელეფონიდან ლეპტოპზე გადატანა შესაძლებელია როგორც USB კაბელის გამოყენებით, ასევე უსადენოდ, ორივესთვის მკაფიო დადებითი და უარყოფითი მხარეებით. ფოტოების ტელეფონიდან ლეპტოპზე USB კაბელის გამოყენებით გადატანა აუცილებლად ხელით პროცესია. თუ ამ პროცესს იყენებთ სარეზერვო ასლების შესაქმნელად, შეიძლება დროდადრო დაგავიწყდეთ და ეს შეიძლება იყოს პრობლემა. მეორეს მხრივ, ადგილობრივი სარეზერვო ასლის ქონა ყოველთვის კარგია, ამიტომ ყოველთვის ხშირად უნდა გადაიტანოთ ფოტოები ტელეფონიდან ლეპტოპზე პირდაპირ USB კაბელის და მესამე მხარის გადაწყვეტილებების გამოყენებით, როგორიცაა Dr.Fone Phone Manager, რათა მოგაწოდოთ უპრობლემოდ. დააჭირეთ გადაცემის გამოცდილებას. ღრუბლოვანი სერვისების გამოყენებით, როგორიცაა DropBox და OneDrive, შეგიძლიათ გადაიტანოთ ფოტოები შემთხვევით და მოხერხებულად, ასევე აირჩიოთ სრული ფოტო ბიბლიოთეკის სარეზერვო ასლები, თუ გსურთ.
ტელეფონის გადაცემა
- მიიღეთ მონაცემები Android-იდან
- ანდროიდიდან ანდროიდზე გადატანა
- ანდროიდიდან BlackBerry-ზე გადატანა
- კონტაქტების იმპორტი/ექსპორტი ანდროიდის ტელეფონებში
- აპების გადატანა ანდროიდიდან
- ტრანსფერი ანდრიოდიდან ნოკიაში
- Android-ზე iOS გადაცემა
- Samsung-დან iPhone-ზე გადატანა
- Samsung-ზე iPhone-ზე გადაცემის ინსტრუმენტი
- გადატანა Sony-დან iPhone-ზე
- გადატანა Motorola-დან iPhone-ზე
- გადატანა Huawei-დან iPhone-ზე
- ანდროიდიდან iPod-ზე გადატანა
- გადაიტანეთ ფოტოები Android-დან iPhone-ზე
- ანდროიდიდან iPad-ზე გადატანა
- გადაიტანეთ ვიდეოები ანდროიდიდან iPad-ზე
- მიიღეთ მონაცემები Samsung-ისგან
- გადაიტანეთ მონაცემები Samsung-ში
- ტრანსფერი სონიდან სამსუნგში
- გადატანა Motorola-დან სამსუნგში
- Samsung Switch-ის ალტერნატივა
- Samsung ფაილების გადაცემის პროგრამა
- LG ტრანსფერი
- ტრანსფერი სამსუნგიდან LG-ში
- LG-დან ანდროიდზე გადატანა
- გადატანა LG-დან iPhone-ზე
- სურათების გადატანა LG ტელეფონიდან კომპიუტერზე
- Mac-ზე Android გადაცემა


Alice MJ
პერსონალის რედაქტორი