How to Play Pokemon Go on PC with/without BlueStacks
Apr 28, 2022 • Filed to: All Solutions to Make iOS&Android Run Sm • Proven solutions
- Part 1: How BlueStacks works with Pokemon Go
- Part 2: Play Pokemon Go on PC with BlueStacks (1 hour to set up)
- Part 3: Play Pokemon Go on PC without Bluestacks (5 min to set up)
Part 1: How BlueStacks works with Pokemon Go
BlueStacks App Player is basically an Android emulator. Its work is to run or play your desired app or game in your PC. We all are aware of the fact that Pokemon Go is a game the demands going outside to hunt the Pokemon characters. And in this process, many users get frustrated to see their battery drainage so fast. There comes BlueStacks for Pokemon Go handy. BlueStacks’ full customizable environment and support makes it the best choice for playing games on computer. When you have BlueStacks with you, you can install Pokemon Go in it and use the customize controls. The BlueStacks can be configured to work with Google Play account so that Pokemon Go can be easily accessed. In this article, we will cover how you can play Pokemone Go with BlueStacks on your PC.
Part 2: Play Pokemon Go on PC with BlueStacks (1 hour to set up)
Let us know how to play Pokemon Go in BlueStacks in this section. Read carefully the requirements and setting up process so as to get everything done smoothly.
2.1 Preparations
Before you learn why BlueStacks for Pokemon Go in 2020 is a great idea, we want to make you aware with some of the essentials. Once you are thorough with the prerequisites, we will let you learn how to play Pokemon Go in BlueStacks. Let us explore!
Requirements:
- To use this Android emulator, your Windows should be Windows 7 or higher version. If you are a Mac user, it should be macOS Sierra and higher.
- The system memory should be of 2GB and more as well as 5GB hard drive. In case of a Mac, there should be 4GB RAM and 4GB disk space.
- You should have admin rights in order to install the software.
- Keep the graphic card driver version updated.
Needed Tools:
- Firstly, of course you have to have BlueStacks through which you can play the game on PC.
- You will be required a tool that can help you root your Android device. And for this, you need to have KingRoot. Having root access to Android device is necessary to make Pokemon Go happen on PC.
- Next up, you need Lucky Patcher. This tool lets you deal with the app permissions. You can control the permissions when the app is installed on your device.
- Another app that you will need is Fake GPS Pro in order to spoof the location. Since Pokemon Go is a game that demands you to keep moving in real time and this app will help you do that. However, the app is paid and costs $5. But you can take help of third-party app stores to download it for free.
- After you download the above tools and apps, it’s time to go for Pokemon GO apk.
2.2 How to set up Pokemon Go and BlueStacks
Step 1: Get BlueStacks Installed
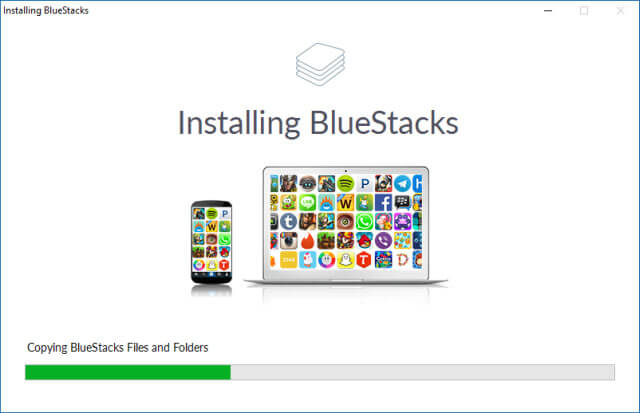
To begin, download and install BLueStacks on your computer. Followed by this, you are required to set up your Google account to make things go smoother.
Step 2: Install and Open KingRoot
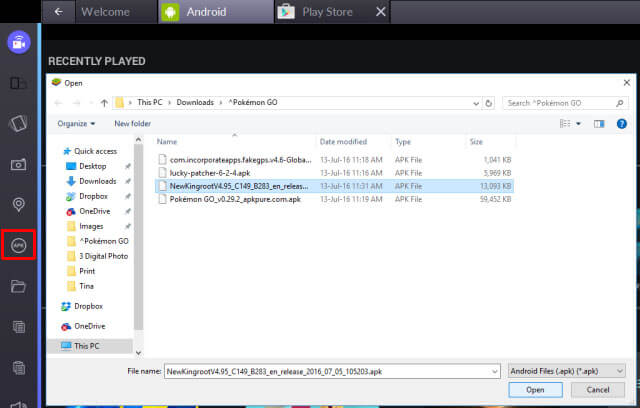
Download the KingRoot apk in the first place. Once done, you need to open BlueStacks to install it. Hit on the “APK” icon on the left. Look for the respective APK file and the KingRoot app will install itself.
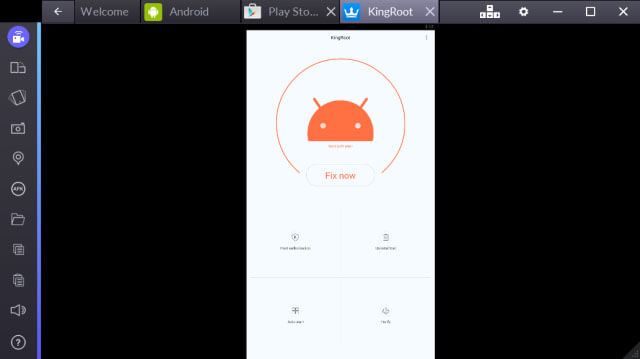
When installed, run KingRoot and hit on “Try it followed by “Fix now”. Click “Optimize now” and exit KingRoot as it will not be needed anymore now.
Step 3: Start BlueStacks Again
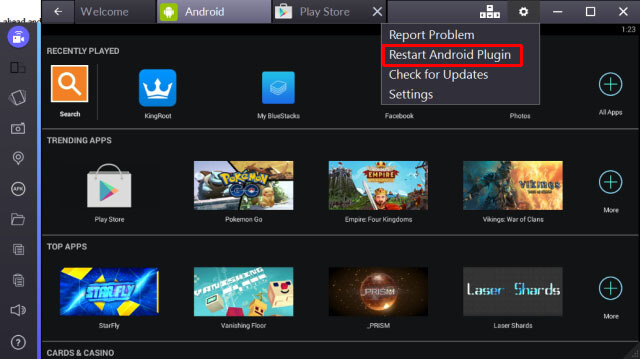
Now, you have to restart BlueStacks. For this, click the cogwheel icon which means the Settings. Click on “Restart Android Plugin” after that from the drop down menu. BlueStacks will be restart.
Step 4: Install Fake GPS Pro
Now, you need to download Fake GPS Pro from the Play Store. Install it the same way you did for KingRoot.
Step 5: Get Lucky Patcher Installed
The installation for this also goes the same way as KingRoot. Click the “APK” and browse your apk file. After you install it, open Lucky Patcher. Hit on “Allow” to give access to the installed apps.
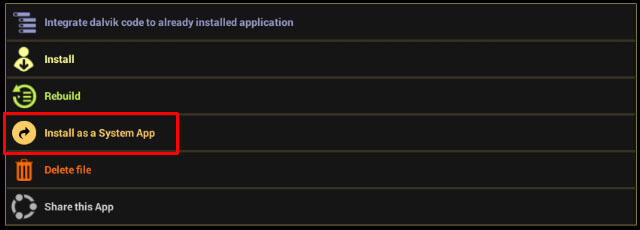
When it is opened, head to the “Rebuild & install” option at the bottom right. Now, move to “sdcard” followed by “Windows” > “BstSharedFolder”. Now, choose APK file for Fake GPS and hit on “Install as a System App”. Hit “Yes” to confirm and proceed for installation.
Next, you again need to restart BlueStacks. You can refer to the step 3 for this.
Step 6: Install Pokemon Go
Download Pokemon Go and install it simply as you did for the above apps. However, don’t launch it right now as it will not work.
Step 7: Tweak Location Settings
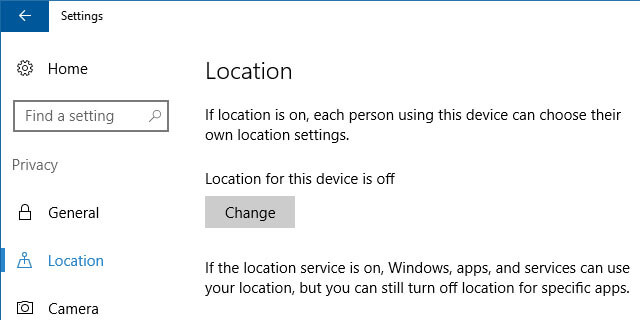
In BlueStacks, click Settings (cogwheel) and choose “Location”. Set the mode to “High accuracy. Disable any GPS service for now to avoid any interference. And for this, press “Windows + I” and go to “Privacy”. Head to “Location” and turn it off. For previous versions than Windows 10, open Start menu and search Location. Disable it now.
Step 8: Set up Fake GPS Pro
You need to return to the Lucky Patcher app. Here, you could see the Fake GPS in the list. If not, head to the “Search” at the bottom and choose “Filters”. Mark “System Apps” and hit “Apply”.

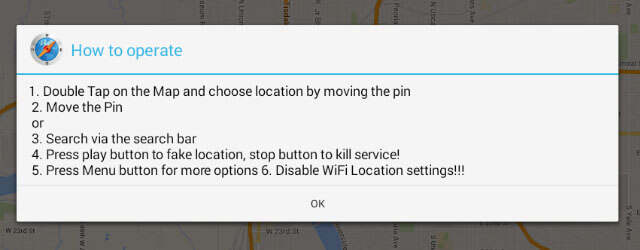
You can now select FakeGPS from the list and click “Launch App”. A pop-up windows will come that will tell you instructions with the heading “How to operate”. Read them and hit “OK” to close it.
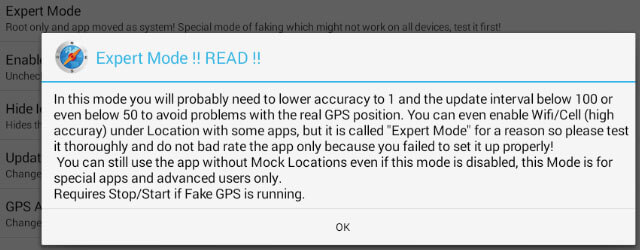
Now, hit on the three dotted button located at the top right. Head to “Settings” and mark “Expert Mode”. A warning message will appear. Read it and hit “OK”.
Hit on the back arrow given at the top left. Choose the location you desire. Hit the entry and choose “Save”. This will add this particular location to favorites. Now, click the play button and fake location will be enabled.
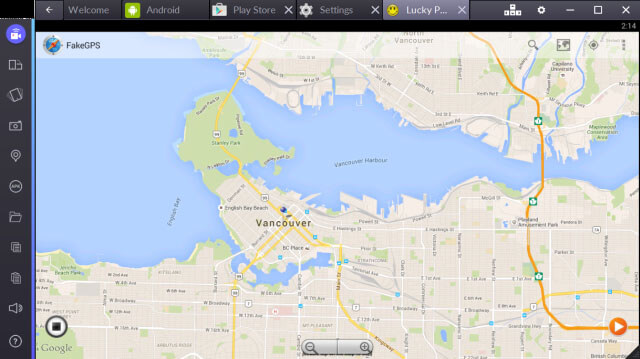
You are all set to play the game now.
2.3 How to play Pokemon Go with Bluestacks
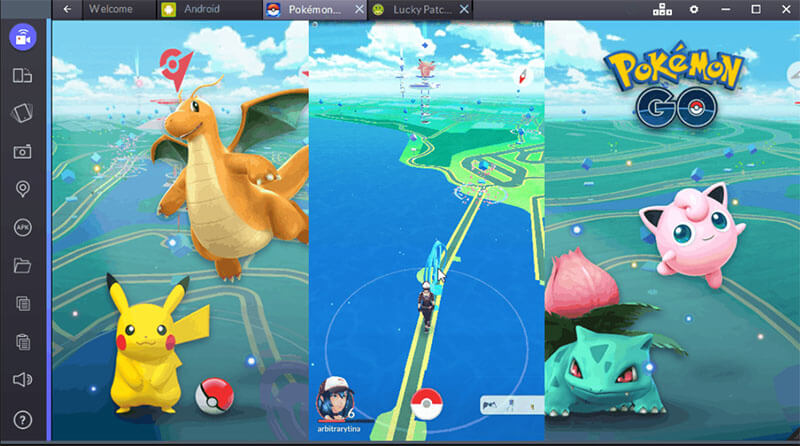
After you have followed the above instructions carefully, you can now play Pokemon Go in BlueStacks. Launch Pokemon Go now. And if you find it time consuming to launch, please don’t panic.
Set it up as you normally do in an Android device. Log in with Google and it will detect the account you attached with Pokemon Go earlier. When it launched, you will see yourself in the location you just faked above.
If any time you want t move to another spot, you need to open FakeGPS and set a new spot. To ease this, setting s few locations as favorites comes in handy.
You can now detect the Pokemon and if the camera doesn’t work, simply disable AR mode on asking. Confirm it and catch the Pokemons in virtual reality mode.
Part 3: Play Pokemon Go on PC without Bluestacks (5 min to set up)
3.1 Shortcomings of Bluestacks
No matter playing Pokemon Go in BlueStacks is fun, but there are indeed some shortcomings that come with it. Here we discuss them in the following points.
- Firstly, many of you can find the process a little complex. In fact, much complex! As there are lots of tools needed and many things are needed to keep in mind. This may become annoying and can mess with the system if not done properly.
- Secondly, BlueStakcs is not for beginners and non tech-savvy. At least this is what we feel. As mentioned already, there are plenty of things to be taken care of, so performed by tech person is what makes sense.
- It has high failure rate as said by many users.
3.2 How to play Pokemon Go on PC without Bluestacks
As you know the drawbacks linked with BlueStacks, you might be wondering how you can play Pokemon Go without BlueStacks. Well! If you are not comfortable with BlueStacks for Pokemon Go, we have a solution for you. You can get this game played by simply simulating your actual movement. You can show the fake route without moving. And to help you on this, you can take help of dr.fone – Virtual Location (iOS) . It has higher success rate and you can change and mock your location in minutes. Note that this tool is only for iOS devices for now. Here is how to work with this.
Method 1: Simulate Along a Route Between 2 Spots
Step 1: Download the Program
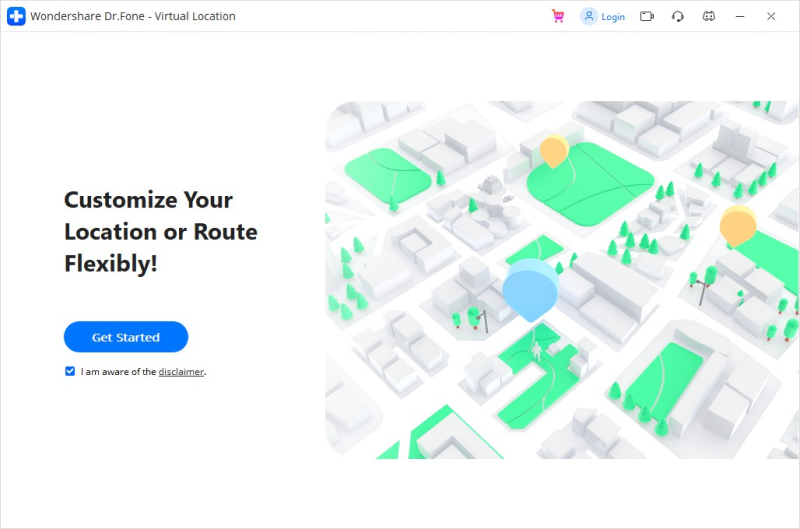
დაიწყეთ ინსტრუმენტის ჩამოტვირთვა თქვენი კომპიუტერიდან ოფიციალური ვებსაიტიდან. დააინსტალირეთ და გაუშვით კომპიუტერზე. ახლა დააწკაპუნეთ "ვირტუალური მდებარეობა" ოფციაზე მთავარი ინტერფეისიდან.

ნაბიჯი 2: დაამყარეთ კავშირი
დაამყარეთ მყარი კავშირი თქვენს iPhone-სა და კომპიუტერს შორის განათების კაბელის გამოყენებით. ახლა დააჭირეთ ღილაკს "დაწყება" წინსვლისთვის.
ნაბიჯი 3: აირჩიეთ 1 გაჩერების რეჟიმი
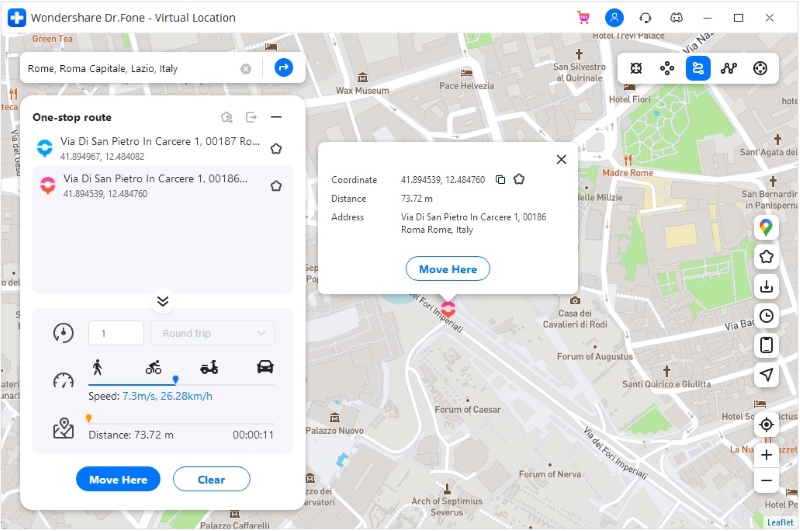
შემდეგი ეკრანიდან, სადაც რუკა ჩანს, დააწკაპუნეთ პირველ ხატულაზე მარჯვენა ზედა კუთხეში. ეს ჩართავს 1 გაჩერების რეჟიმს. დასრულების შემდეგ, თქვენ უნდა აირჩიოთ ადგილი, სადაც გსურთ ტყუილად გადაადგილება.
ამის შემდეგ აირჩიეთ სიარულის სიჩქარე. ამისათვის თქვენ ნახავთ სლაიდერს ეკრანის ბოლოში. თქვენ შეგიძლიათ გადაათრიოთ ის თქვენი არჩევანის მიხედვით, რათა დაარეგულიროთ მოგზაურობის სიჩქარე. გამოჩნდება pop-up ფანჯარა, სადაც თქვენ უნდა დააჭიროთ ღილაკს "გადატანა აქ".
ნაბიჯი 4: დაიწყეთ სიმულაცია
ისევ ამოვა ყუთი. აქ თქვენ უნდა შეიყვანოთ ციფრი, რომელიც განსაზღვრავს რამდენჯერ გსურთ გადაადგილება. დააჭირეთ "მარტს" ამის შემდეგ. ახლა თქვენ შეძლებთ ნახოთ თქვენი მდებარეობის მოძრაობა თქვენ მიერ არჩეული სიჩქარის მიხედვით.
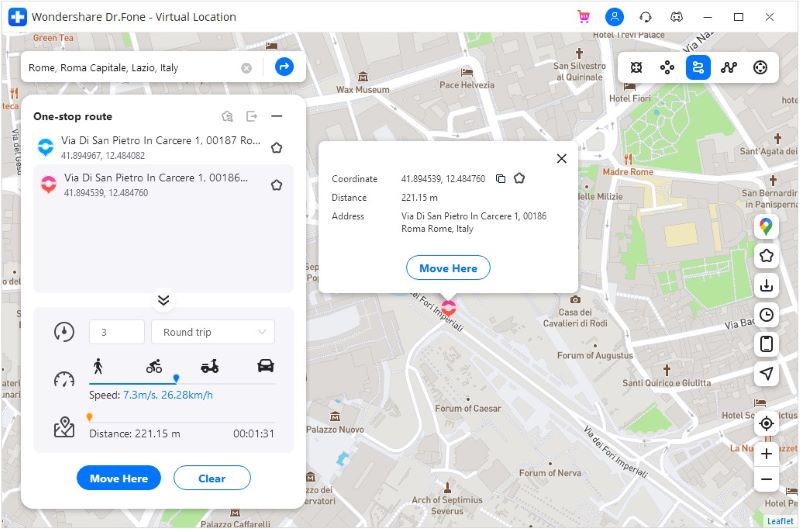
მეთოდი 2: სიმულაცია მარშრუტის გასწვრივ მრავალი ადგილისთვის
ნაბიჯი 1: გაუშვით ინსტრუმენტი
როგორც გასაგებია, გაუშვით პროგრამა თქვენს კომპიუტერში. დააწკაპუნეთ "ვირტუალურ მდებარეობაზე" და დააკავშირეთ მოწყობილობა. აირჩიეთ ღილაკი "დაწყება".
ნაბიჯი 2: აირჩიეთ მრავალ გაჩერების რეჟიმი
ეკრანის მარჯვენა მხარეს მოცემული სამი ხატიდან უნდა აირჩიოთ მეორე. ეს იქნება მრავალ გაჩერების რეჟიმი. შემდგომში, შეგიძლიათ სცადოთ აირჩიოთ ყველა ადგილი, რომლის გაყალბება გსურთ.
დააყენეთ მოძრაობის სიჩქარე, როგორც ადრე გააკეთეთ და დააწკაპუნეთ "გადატანა აქ" ამომხტარი ველიდან.
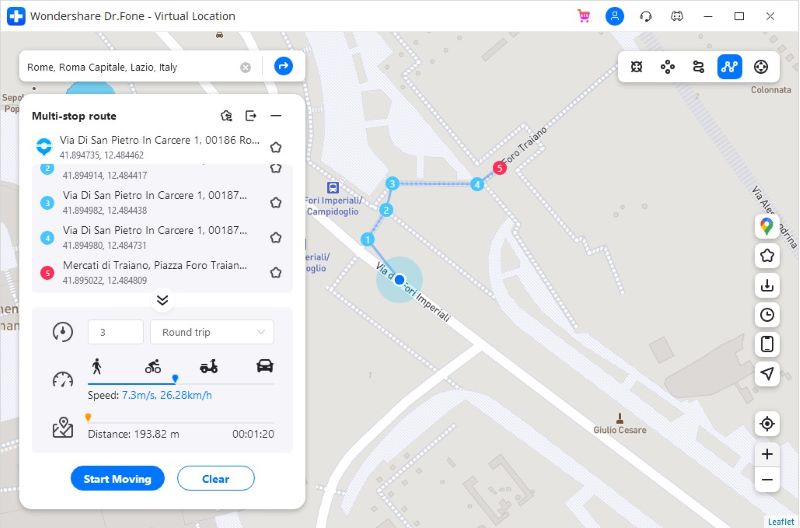
ნაბიჯი 3: გადაწყვიტეთ მოძრაობა
მეორე ამომხტარ ველზე, რომელსაც ხედავთ, შეიყვანეთ ნომერი, რომ უთხრათ პროგრამას რამდენჯერ გსურთ წინ და უკან წასვლა. დააჭირეთ ღილაკს "მარტი". მოძრაობა ახლა დაიწყებს სიმულაციას.
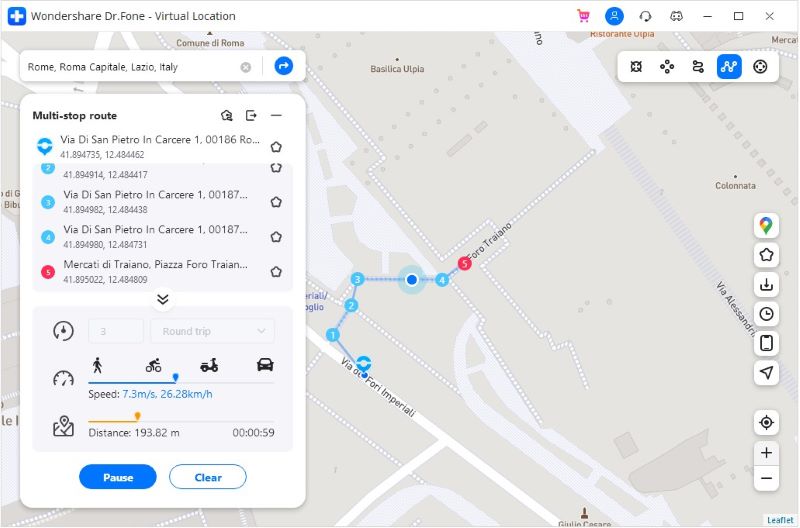
დასკვნითი სიტყვები
ჩვენ ვუძღვნით ამ სტატიას Pokemon Go-ს ყველა მოყვარულს და ვისაც უბრალოდ სურს, რომ ეს თამაში კომპიუტერზე იყოს. თქვენ ისწავლეთ ყველა კარგი და ცუდი BlueStacks-ის შესახებ. ჩვენ ასევე გაგიზიარეთ Pokemon Go-ს დაყენებისა და თამაშის პროცესი BlueStacks-ში. ვიმედოვნებთ, რომ მოგეწონათ ჩვენი ძალისხმევა. კარგი იქნება, თუ დაწერთ ერთ-ორ სიტყვას ქვემოთ მოცემულ კომენტარების განყოფილებაში, რომ გვითხრათ, როგორ შეგვიძლია დაგეხმაროთ. გმადლობთ, რომ დრო დაგვითმეთ!
ვირტუალური მდებარეობა
- ყალბი GPS სოციალურ მედიაში
- ყალბი Whatsapp მდებარეობა
- ყალბი mSpy GPS
- შეცვალეთ ინსტაგრამის ბიზნეს მდებარეობა
- დააყენეთ სასურველი სამუშაო ადგილი LinkedIn-ზე
- ყალბი Grindr GPS
- ყალბი Tinder GPS
- ყალბი Snapchat GPS
- შეცვალეთ ინსტაგრამის რეგიონი/ქვეყანა
- ყალბი მდებარეობა Facebook-ზე
- შეცვალეთ მდებარეობა Hinge-ზე
- Snapchat-ზე მდებარეობის ფილტრების შეცვლა/დამატება
- ყალბი GPS თამაშებზე
- Flg Pokemon go
- Pokemon go ჯოისტიკი ანდროიდზე როუტის გარეშე
- გამოჩეკვის კვერცხები პოკემონში გადის სიარულის გარეშე
- ყალბი GPS Pokemon Go-ზე
- Spoofing Pokemon Go Android-ზე
- ჰარი პოტერის აპლიკაციები
- ყალბი GPS ანდროიდზე
- ყალბი GPS ანდროიდზე
- ყალბი GPS ანდროიდზე დაფესვიანების გარეშე
- Google მდებარეობის შეცვლა
- გააფუჭეთ Android GPS Jailbreak-ის გარეშე
- შეცვალეთ iOS მოწყობილობების მდებარეობა


ჯეიმს დევისი
პერსონალის რედაქტორი